Follow these instructions to configure your Azure AD account to connect to WhosOff for single sign on purposes.
PRE-REQUISITES:
- A Microsoft Entra user account. If you don't already have one, you can create an account for free
- One of the following roles: Global Administrator, Cloud Application Administrator, Application Administrator, or owner of the service principal
- Completion of the steps in Quickstart: Create and assign a user account
- You will need to have an existing account on WhosOff
- You will need to be a registered super user on your WhosOff account
Configuration
1a. Initiate the integration (WhosOff)
- Login to your WhosOff account
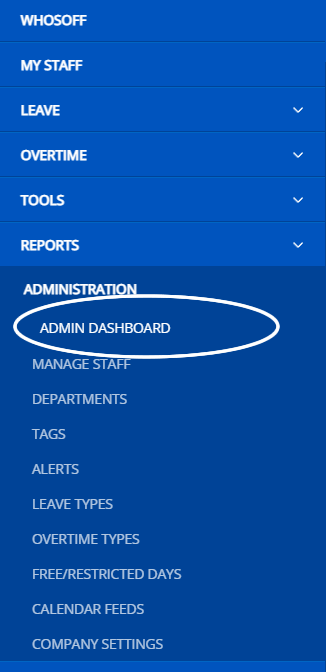
- Click Administration on the Left Hand Menu
- Click Admin dashboard
- On the right of the resulting page, click Company settings

- Click on the Single Sign On tab (left hand side)
- From the SSO provider drop down, select Azure and click on Activate SSO
- Once activated, make a note of the the Entity ID (this will be used to configure Azure/Entra).
- Sign in to the Microsoft Entra admin center as at least a Cloud Application Administrator
- Navigate to Identity > Applications > Enterprise applications > All applications
- Click '+ New Application'
- Enter the name of the existing application in the search box (WhosOff), and then select the application from the search results - you can rename this if you wish, e.g. WhosOff SSO
- Click on the Create button
- In the Manage section of the left menu, select Single sign-on to open the Single sign-on pane for editing
- Select SAML to open the SSO configuration page
- Enter the Entity ID, supplied within your WhosOff account and ensure the Default option is ticked. The other two values can be removed.
- Click on Save
2. Download SAML Certificate (Azure/Entra)
- In the SAML Certificates section, select Download for Federation Metadata XML to download the SAML signing certificate and save it to be used in the next step
4. Complete your configuration (WhosOff)
- You will be prompted to supply your Meta Data file in WhosOff
- Click on the Choose file button to locate the file you downloaded earlier
- Once located, click on the Upload button
- If successful, you should receive a confirmation that looks like the following.

5. Test your integration (Azure/Entra)
Once you have assigned users (we recommend yourself for testing), you can go ahead and test the integration:
- On the Single sign-on page, click on "Test this application" at the top of the page
- On the following screen, click on Test sign in
- Azure/Entra will inform you of any issues. Usually
6. Force Single Sign-On
If you would like to force users to Authenticate through Azure/Entra, head back to your WhosOff account and ensure the option "Force SSO" is selected as "Yes" then click on Save Changes.
PLATFORMS
Web / OnlineVersion 4
CATEGORIES
3rd Party IntegrationsPHRASES
sso, saml, azure ad, single sign on, entraSimilar articles