This article explains how to setup/configure your local server to integrate with WhosOff in order for your Active Directory users to access their WhosOff account without the need for separate login information.
You will require access to your local Web Server. If you do not have this access level, this integration will need to be carried out by a System Administrator or equivalent role within your organisation.
System requirements
You will be required to have the following on your server:
- Microsoft IIS (7+ recommended)
- ASP.NET v4 Framework
- Microsoft Active Directory
Downloading your custom integration file
- Login you your Web Server
- Create a new directory to contain your new website.
- Within your WhosOff account, go to "Administration > Company details", then click on the "Active Directory" tab.
- Download your custom integration connector file to the new directory you created in step 1.
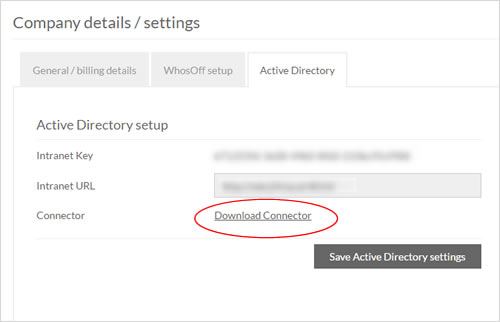
- You may wish to save the file with the name "default.aspx" for convenience later.
Configuring IIS
You may wish to include this integration within an existing local site within IIS, for the purpose of this document we are assuming a new local site will be created.
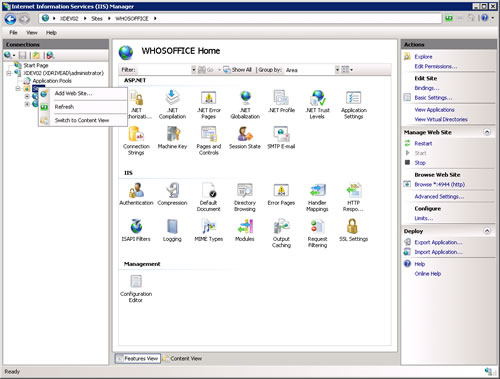
- Login to your Web Server and launch IIS (Internet Information Services)
- From the "Sites" folder, right click, then select "Add Web Site"
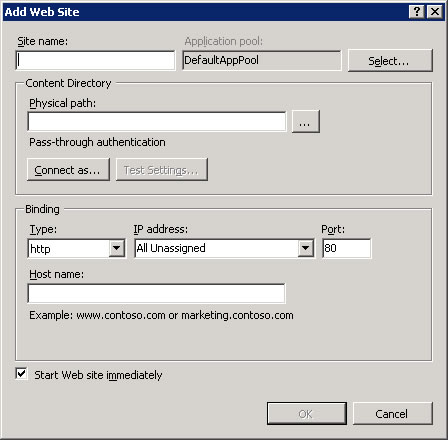
- Supply a name, Application pool (with ASP.NET v4), the physical path for the new site (which you created in the section above), as well as a port, then Click on "OK".
- Within the site settings, double click on "Authentication".
- Make the following settings:
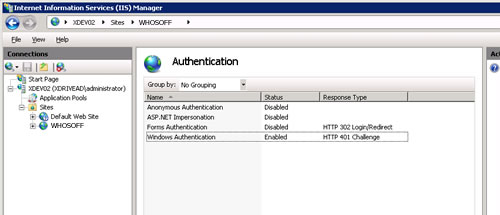
- Anonymous Authentication: Disabled
- ASP.NET Impersonation: Disabled
- Forms Authentication: Disabled
- Windows Authentication: Enabled
- IIS settings are now complete, you may close IIS.
Completing your WhosOff integration
- Login to your WhosOff account, then navigate to "Administration > Company details".
- Click on the "Active Directory" tab.
- Complete the field labelled "Intranet URL" with the local address of your new website created in the step above. e.g. "http://localhost:823/autologin_whosoff.com.aspx" (or http://localhost:823/" if you followed step 5 in the first section of this document and your file is called default.aspx)
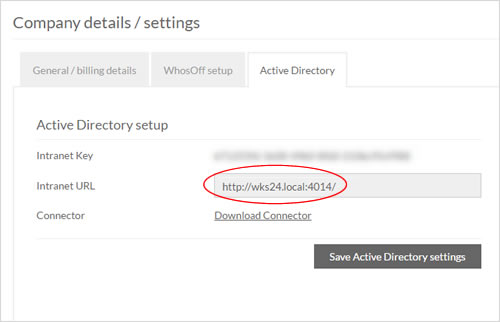
- Click on Save details.
- Navigate to "Administration > Manage Staff".
- Click on your user record
- On the left go to Account Details
- Under the "Account Setup" section complete the field labelled "AD Username" before clicking on "Save Account Details". This is the full Active Directory Domain\Username used to link your account to WhosOff.

Testing the integration
- Open a new Web Browser window and navigate to the new website you created on your local Web Server.
- If successful you will be automatically logged into your WhosOff account.
- To complete the process for other users on your Active Directory/WhosOff account, repeat Steps 5-7 in the section above.
If you have any problems, contact our support team at support@whosoff.com
PLATFORMS
CATEGORIES
PHRASES
active directory, ad, active, directorySimilar articles
This article explains how to setup/configure your local server to integrate with WhosOff in order for your Active Directory users to access their WhosOff account without the need for separate login information.
